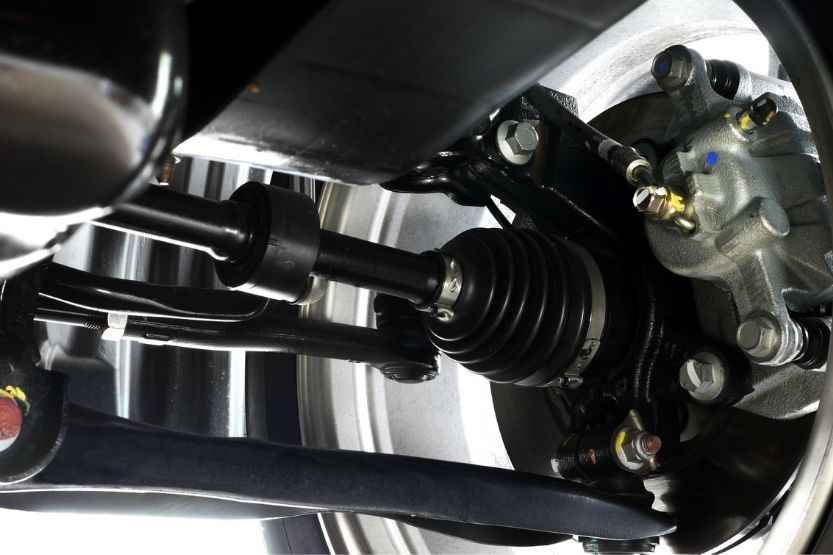
Front-wheel drive vehicles and independent rear suspension vehicles use a Constant Velocity (CV) axle. The CV axle delivers power directly from the engine onto the wheels. But how would you know if there’s something wrong with your vehicle’s CV axle? What are the symptoms of a bad CV axle?
Faulty CV axle symptoms are as follows:
- Clicking noises when turning
- A knocking sound
- Grease on the inside or edge of the wheels
- Vibration while driving
For CV axle replacement, you can bring your car or truck to a mechanic or replace it yourself with a CV axle puller tool.
The CV axle replacement cost at a service center will most likely range between $225 and $320. If you have know-how in terms of CV axle replacement, you can purchase a CV axle for $50 to $80.
Read on to learn more about these CV axle symptoms and how to fix it.
Importance of the CV Axle to Your Vehicle
A broken CV axle symptoms are as follows:
- Clicking noises when turning
- A knocking sound
- Grease on the inside or edge of the wheels
- Vibration while driving
For CV axle replacement, you can either have a mechanic replace it or do it yourself by using a CV axle puller tool.
If you choose the first option, a CV axle replacement will cost you between $225 and $320. If you have know-how in terms of CV axle replacement, you can purchase a CV axle for $50 to $80.
Before we further discuss these symptoms, let’s learn more about the CV axle’s importance to your vehicle.
Front-Wheel Drive Vehicles
Front-wheel drive vehicles all have CV joints on both ends of their drive shafts. CV joints are important as they transfer the engine power to the drive wheels, regardless of the turning angle coming from the transmission. It helps transfer power at a constant speed while the suspension makes an up-and-down motion.
With front-wheel-drive vehicles, the torque is delivered by CV joints to the front wheels during turns. The most common types of CV joints are the tripod type and the ball type. In front-wheel drive vehicles, tripod type CV joints are used on the drive shafts’ inner side.
Whereas the ball-type ones are used on the outer. Suffice it to say that they are also referred to as inner CV joints and outer CV joints, respectively.
The outer CV joints link the drive shafts to the drive wheels. In contrast, the inner CV joints link the drive shafts to the transmission. Four-wheel-drive and rear-wheel drive vehicles, including trucks, also have these joints.
Universal Joints
Some vehicles use universal joints in which a cross-shaped metal pivot is positioned between two forked carriers. This is typically seen in Citroen Traction Avant and Land Rover. However, these are not considered CV joints as they bring about variations in terms of angular velocity.
These joints provide a flexible coupling in prop shafts. But they can also be notchy and inconvenient to turn when used at extreme angles.
With the popularity of front-wheel-drive systems, the use of universal joints has become limited. Typically, CV joints can work for a long period if properly maintained. If it malfunctions, the joint will cause engine power to drop and will not transmit enough power to the vehicle.
What Is a 2-Axle, 3-Axle, and 4-Axle Vehicle?
Faulty CV Axle Symptoms
Let’s further discuss the above-mentioned four CV Axle symptoms:
Clicking Noises When Turning
At times, this noise is described as a loud click. Other times, it is described as pop. But once you hear it, you would be able to identify it unmistakably.
You hear the noise when you turn the vehicle because the sound results from a worn CV axle’s loose joints. Once you hear this noise, don’t think twice about going to a service center to check your vehicle.
A Knocking Sound
Aside from the clicking noise, you will also hear a clunking or knocking sound. When you hear this sound, it doesn’t automatically mean that the problem is related to the CV axle. Nonetheless, if you hear such an unusual knocking or clunking sound, it is always best to bring your vehicle to the service center.
You can further conclude that a CV axle repair is needed if the knocking sound consistently occurs when your vehicle is in reverse mode. In which case, your vehicle might not be safe to drive, and so, you are recommended to visit the service center immediately.
Grease on the Inside or Edge of the Wheels
The CV axle joints have boots with grease as the axle spins to keep it from leaking. If the CV axle boot then develops a leak, there is a lack of lubrication. This occurrence can lead to CV joint failure.
If you notice grease on the edge of your vehicle’s tire or even the inside of the wheel, the chances are that the CV axle has a problem.
Vibration While Driving
There are several reasons behind the occurrence of vibration in a vehicle. That’s why when you notice your car vibrating, it doesn’t automatically mean that the problem is with the CV axle.
However, if the vibration increases with speed and there is a “bouncy” feel while driving, the CV axle may have something to do with it. Another indication is when you notice excessive vibration.
If you notice all these and still don’t try to have your vehicle fixed, the chances are that it will be harder to control your car due to too much vibration. This might lead to further damage and, worse, an accident.
So, to reiterate the top signs that your car has a bad CV axle, here they are:
- There are clicking noises when turning
- There’s a knocking sound
- You will notice grease on the inside or edge of the wheels
- There’s vibration while driving
CV Axle Replacement

Let’s now talk about CV axle replacement.
First, you need to remove the wheels and put them back once the job is done. To do this, you will need a floor jack to jack the car up:
Removal of the Axle Nut Cotter Pin
Most vehicles have a cotter pin that secures the outer axle nut and prevents detachment from the CV joint. To remove the cotter pin from the axle snout, you will have to use a pair of side cutters or dikes. In some cases, there is a star wheel that also has to be removed once you have removed the cotter pin.
Axle Nut Removal
To loosen or remove the axle nut, you can choose from the three methods.
The first method is by using an impact wrench. This is by far the easiest and most convenient method of all.
Second, you can seek assistance from someone who can hold the brakes while using a breaker bar. This will prevent the axle from turning.
The third method is to have the wheel on. For this method, you don’t have to jack the car up first. The wheels need to touch the ground to loosen the nut. You should reverse this method to tighten the nut once the CV axle has been replaced.
Ball Joint Disconnection
You have to disconnect the lower control arm for the strut to loosen. This is important to reach the CV axle joint and pull it out of the bearing hub.
In order to do this, you have to undo the lower ball joint. This will allow room to remove the CV axle.
The cotter pin may not always be present. There are ball joint nuts that don’t require a cotter pin. But it must be remembered that there are those with a cotter pin. Those that do not have a cotter pin are self-locking and hold themselves in place.
If there is a cotter pin, you have to remove it from the ball joint using a pair of dikes.
Outer CV Joint Removal
By this time, you should have succeeded in loosening the lower control arm. The next step is to pull the spindle outward from the vehicle. Then, by using a hammer, gently tap the end of the CV joint snout. This is expected to make the axle come out of the wheel hub spline.
Such a method is supposed to be easy and convenient to do. However, if the CV axle seems stuck, you can put a WD-40 degreaser on the spline and leave it for a few minutes. The WD-40 degreaser is expected to loosen any rust that causes the CV axle to get stuck.
You don’t need to worry that the snout threads will get damaged. Besides, you will replace the CV axle anyway. For axle reinstallation, the nut has to be installed onto the axle threads. Make sure to turn it three times to ensure that the threads are protected.
Some vehicles have an intermediate bearing mount. In which case, it needs to be unbolted for you to be able to remove the axle. To do this, you will most probably need a 12 mm or 14 mm wrench or socket.
If the vehicle does not have this bearing, try to use a large pry bar and wedge it between the axle and pry outward and the transmission case. You have to firmly grasp the axle as you hold the spindle outward as you carefully remove the axle out from the transmission.
Ensure that the Old CV Axle Matches the New Unit
Check if the old CV axle consistently matches its new replacement. They have to be identical. Otherwise, you may not complete this job successfully.
Do not throw the old CV axle right away. Keep it in case you need it for reference, to check their similarity or difference until the job has been completed.
In case the old axle features an ABS stator ring on the outer CV joint, you have to make sure that the CV axle replacement also features one. Otherwise, once you complete the job, the ABS light will most likely turn on.
Installation of the New CV Axle
Firmly grasp the new CV axle and carefully feed it back into the transmission. Do this with utmost care to prevent the transmission seal from getting damaged.
Carefully make a forward thrusting motion to place the axle into the transmission. You might have to jostle it until you are sure that it is fully and properly installed slightly. Remember that improper installation will cause the vehicle to come to a stop.
Lower Ball Joint Reconnection
Hold down the lower control arm and maneuver the lower ball joint stud into the spindle. Install the ball joint nut to force the control arm upward. Fully tighten the nut by using a large wrench. If required, reinstall a new cotter pin.
CV Axle Nut Reinstallation
You don’t need a tool to reinstall the CV joint axle nut. By using your bare hands, you can do so to prevent cross-threading.
CV Axle Replacement Cost

The CV axle replacement cost at a service center will most likely range between $225 and $320.
If you have a know-how in terms of CV axle replacement, you can purchase a CV axle for $50 to $80.
CV Axle Puller Tool
To ensure that you will efficiently and conveniently pull the old CV axle and smoothly put the new CV axle replacement, it is advisable to use a CV axle removal tool.
Here are two of the most recommended CV axle puller tools:
- Posi Lock 106 Manual Puller
- OTC (7509) Inner CV Joint Puller
Posi Lock 106 Manual Puller

Click here to see it on Amazon.
The Posi Lock 106 Manual Puller is a choice at service centers. If you use this, you will notice that regardless of the diameter being worked on, the external cage follows the puller’s contour flawlessly.
OTC (7509) Inner CV Joint Puller

Click here to see it on Amazon.
The OTC (7509) Inner CV Joint Puller is one of the most popular CV axle puller tools on Amazon. It can conveniently remove a stuck axle in less than 5 minutes. It makes CV axle replacement quick and easy.
Conclusion – CV Axle
The top signs that your car has a bad CV axle include the following:
- There are clicking noises when turning
- There’s a knocking sound
- You will notice grease on the inside or edge of the wheels
- There’s vibration while driving
If you notice that your vehicle has any of these signs, it is best to bring it immediately to the service center. But if you know how to fix and replace your vehicle’s CV axle, then I suggest that you make use of any of these CV axle removal tools:
- Posi Lock 106 Manual Puller
- OTC (7509) Inner CV Joint Puller
Indeed, these tools are guaranteed to make a CV axle replacement job easier.
Read next:
Wheel Bearing Replacement Cost [Front or Rear]
CV Joint Noise [When Driving Straight or Turning]
What Is the Difference Between Bagged and Static?