
The electric parking brake is one of the many technologies added by automakers to the features of modern vehicles. But like any other electronic system, issues can occur too. So what are the common causes of electric parking brake problems? How do you fix it?
The common causes of electric parking brake problems are broken, shortened, or opened switches or wires between the module and the actuator. If they develop high resistance, it can lead to a problem too.
Here are the steps to troubleshoot an electric parking brake problem:
- Park the Vehicle
- Loosen the Affected Wheel’s Lug Nuts
- Remove the Wheel
- Find the Electrical Connector to the Caliper
- Check the Power Supply Received By the Electric Actuator Motor
- Check the Voltage Reading
- Test the Actuator
- Put Everything Back in Place
Read on to learn more about the causes of electric parking brake problems, including those encountered in Honda vehicles, and how to fix them.
Electric Parking Brake Problems [Causes and How to Fix]

Broken or Opened Switches
There are several reasons why electric parking brake (EPB) problems occur. It can be because it has broken, shortened, or opened switches or wires between the module and the actuator. If they develop high resistance, it can also lead to an EPB issue.
Symptoms of an Electric Parking Brake Problem
There are two ways of knowing if your vehicle is experiencing an electric parking brake problem. First, the parking brake light flashes. Second, a message on the dashboard will appear. It will alert you that your vehicle needs a parking brake service immediately.
Steps to Troubleshoot an Electric Parking Brake Problem
Here are the steps to troubleshoot an electric parking brake problem:
- Park the Vehicle
- Loosen the Affected Wheel’s Lug Nuts
- Remove the Wheel
- Find the Electrical Connector to the Caliper
- Check the Power Supply Received By the Electric Actuator Motor
- Check the Voltage Reading
- Test the Actuator
- Put Everything Back in Place
Let’s briefly discuss each one of them:
1. Park the Vehicle
Before you start troubleshooting, make sure to park your vehicle in a safe area with level ground. To be sure, place wheel chocks on the rear wheels.
2. Loosen the Affected Wheel’s Lug Nuts
Loosen the lug nuts of the affected wheel using a tire wrench. You must turn the wrench counterclockwise.
3. Remove the Wheel
The next step is to detach the wheel from the affected side. But first, you have to hoist your vehicle using a jack. Then, make sure that a jack stand supports the jack.
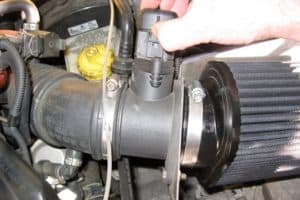
4. Find the Electrical Connector to the Caliper
Now, locate the electrical connector to the caliper. Then, you have to disconnect it so you can proceed with testing. Disconnect by pushing the locking tabs before pulling the connector off.
5. Check the Power Supply Received By the Electric Actuator Motor
You will use a multimeter tester to check the power supply received by the electric actuator motor. Set the multimeter to measure the direct current (DC).
Select the DC icon, which features one straight line and three short horizontal lines below it. Then, locate the connector leading to the main harness or the body of the wiring. Attach the red and black leads accordingly to both ends of the connector.
6. Check the Voltage Reading
The next step is voltage reading. Initially, there should be a very low voltage reading, if not zero. To do this step, you need another person to turn the ignition on or start the engine and set the parking brake on.
If the voltage reading ranges between 10 and 12, or -10 and -12 volts, you are assured that the actuator has decent power. Should the voltage be lower than 10 volts, or if it is zero, you should check the condition of the fuse or the wiring.
It is important to note that the older multimeter testers feature voltage ranges. It is advisable to set it to 20 volts or higher.
Make sure not to set it to any other voltage settings, especially those ending with MV, which refers to millivolts. If you use this on a 12-volt system, you could damage the multimeter.
7. Test the Actuator
The next step consists of testing the actuator winding for continuity and damage. To do this task, locate the connector first attached to the caliper.
Set the multimeter to continuity or ohms, represented by an icon that looks like the omega symbol. Conduct a multimeter self-test first by connecting the leads and setting the beep on. The result of this self-test is expected to be zero.
If the result is higher, there is most likely something wrong with your multimeter or test leads. In which case, replace your leads or multimeter with a working one.
Once your self-test turns outright, you may now connect both ends of the leads to the connector’s ends. You can tell that your actuator is winding well once you hear a beep.
In which case, the problem is most likely coming from another source, such as the switch. If there is no beep, it is probably because your actuator solenoid needs a replacement.
8. Put Everything Back in Place
Once you are done checking, make sure to put everything back in place. This means removing the jack stand, reinstalling the tire, and fastening the lug nuts.
To fasten the lug nuts back, use a tire wrench and turn it clockwise. You may lower the jack, remove it, and tighten the lug nuts.
If there is a need to check the actuator on the other side, repeat all the steps.
What Is an Electric Parking Brake?
How Does the Electronic Parking Brake Work
Understand First How Traditional Handbrake Works
To understand how the electronic parking brake works, you should first understand how the traditional handbrake works. With the traditional hand brake, the lever tensions a cable every time it is pulled up. The cable squeezes the vehicle’s rear brake pads or shoes onto the brake discs or drums.
This allows the car to be held firmly in place. Some vehicles feature separate pads and discs on the rear axle, especially for the handbrake.
Modern Vehicles Use Electric Motors to Achieve the Locking Effect
Modern vehicles feature electronic parking brakes, also known as electronic handbrakes. They work the same as traditional handbrakes. The difference is that modern vehicles use electric motors to achieve the locking effect.
You have to press a button to lock the rear wheels with modern vehicles. Then, you have to pull the same button up to unlock them.
Whichever system that a vehicle uses, the objective is the same. The traditional handbrake and the electronic parking brake lock the rear wheels to hold the vehicle firmly in place.
Honda Electric Parking Brake Problem
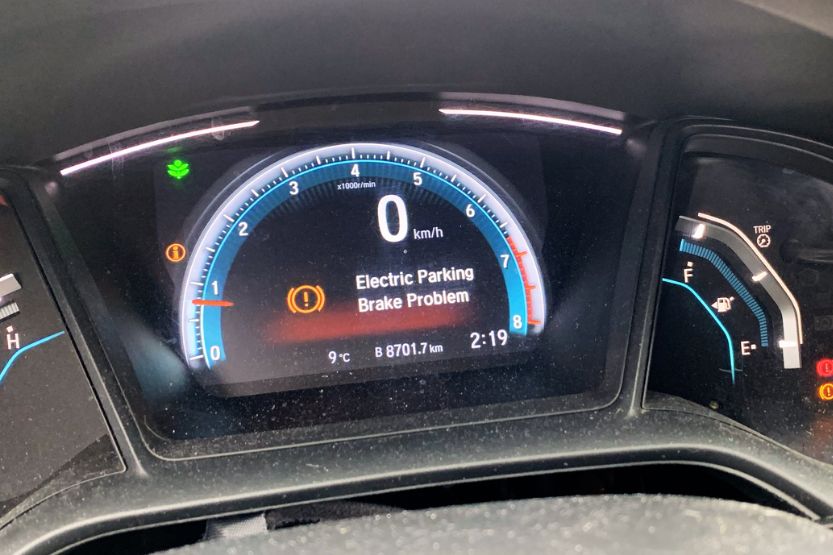
Several Honda car owners have reported issues concerning their electric parking brakes. They reported that the “Electric Parking Brake Problem” error would suddenly appear on the dashboard display. This can be due to several reasons, which include the following:
- Bad Console Parking Brake Switch or Button
- Faulty Wiring
- Caliper Parking Brake Servo Motor
Let’s briefly discuss each one of them, including how to fix them:
1. Bad Console Parking Brake Switch or Button
A bad or dirty console parking brake switch or button seems the most common issue with Honda’s electronic parking brake. The button is placed in the center console, typically the same area where the traditional handbrake is found in vehicles.
Unfortunately, the location is prone to dirt. It can malfunction if a drink spills on it, food crumbs go inside it, or any other form of debris that can trigger its malfunction.
If the electric parking brake button malfunctions due to dirt, you can disassemble the console. Then, replace the switch with a new one. A replacement button is available online, or you can visit your car dealership for assistance.
2. Faulty Wiring
Faulty wiring might be why your parking brake malfunctions. So it is best to check the connection for any loose or worn-out wiring. Check everything, including the wiring in the center console and the clips that connect the parts.
While wiring is not a common electric parking brake problem, it is possible.
3. Caliper Parking Brake Servo Motor
Honda’s electric parking brake features servo motors on the rotors. They are responsible for locking the wheels when the brake is activated. For old parking brakes, the system is mechanical, and they use a cable. With the new systems, the servo motors control them.
If the servo motor goes bad, it then means that it needs a replacement. It is not that hard to replace the motors. Some Honda owners do it on their own. But if you are not sure how it is done, it is best to seek assistance from a professional mechanic or bring your car to a Honda service center.
Again, what causes an electric parking brake problem? Some of the causes of an electric parking brake problem include opened, shortened, broken, or high resistance switches or wires between the actuator and module. Other causes include low voltage and open fuse.
How to Reset Electronic Parking Brake
Let’s talk about the steps for resetting the electronic parking brake of a Honda Civic. They are the following:
- Turn the Ignition On
- Activate the Electric Parking Brake
- Pull, Hold, and Release the Electric Parking Brake Button
The steps are specifically for Honda vehicles. But, in essence, the steps are similar to other vehicles.
1. Turn the Ignition On
The first step is to turn the ignition on, then shift the gear to PARK. Make sure not to press the brake pedal.
2. Activate the Electric Parking Brake
Activate the electric parking brake by pulling and releasing the button.
3. Pull, Hold, and Release the Electric Parking Brake Button
It is important to note that you have to do this step twice.
First, you have to pull and hold the electronic parking brake button. Continue to hold it until you hear a mechanical beep. Once you hear it, you can then release the button.
Second, pull and hold the button up again. Once you hear two mechanical beeps, you can then release the button. This typically takes about 3 seconds before the mechanical beeps go off.
Is It Dangerous to Drive with the Brake Warning Light On?
Frequently Asked Questions – Electronic Parking Brake Issues

Here are some frequently asked questions concerning electric parking brake systems:
How Do You Fix an Electric Parking Brake?
There are several ways of fixing the electric parking brake depending on its issue. In some cases, the issues include a bad console switch or button, a faulty wiring, or a worn-out caliper parking brake servo motor. If these are the problems, check if there is a need to replace some parts.
In some cases, all you need to do is reset the electric parking brake system. You can do this by switching the ignition on and placing the gear shift to Park.
Then, activate the electric parking brake by pulling and releasing its button. Pull and hold the button until a mechanical beep goes off, in which case, you can now release the button.
Then, pull and hold the button again for about 3 seconds or until you hear two mechanical beeps. In this case, you can now release the button. By doing this, you are expected to have successfully reset the system.
How Do You Solve a Honda Civic Electric Parking Brake Problem?
If your Honda Civic encounters an electric parking brake problem, you can troubleshoot it by resetting the system. You can do this by turning the ignition on and shifting the gear to Park.
Then, pull and release the electric parking brake button to activate it. Pull it again, but this time, hold it until you hear a mechanical beep. That’s the time when you can finally release it.
The last step is to pull the button once again. Hold it for about 3 seconds or until you hear two mechanical beeps. Then, release the button. By this time, you are expected to have reset the system successfully.
If resetting the system does not work, you can check its parts. The console switch or button might only have dirt in it, in which case, you have to disassemble the console and clean it.
If this does not work, you might have to replace the switch completely. If there is a faulty wiring or a broken servo motor, you might have to replace these parts too.
How Do You Solve a Honda Accord Electric Parking Brake Problem?
If you encounter an electric parking brake issue with your Honda Accord, you can troubleshoot it by resetting the system. If you encounter a problem while on the road, stop the vehicle and shift to Neutral. Switch off the ignition, then push the parking brake button down for about 2 seconds.
This is expected to suspend the automatic activation. It will restore when you start your Honda Accord.
You can also check the switch, the wiring, and the servo motor. If any of the parts is faulty or broken, there might be a need to replace them.
How Do You Solve a Honda CRV Electric Parking Brake Problem?
If you encounter an electric parking brake issue with your Honda CRV, try troubleshooting it by resetting the system. Using the brake pedal, bring your Honda CRV to a stop. Then, shift the gear to Neutral. Turn the ignition off, then press the parking brake button down for two seconds.
This will suspend the automatic activation. Restart your Honda CRV to fix this issue.
If the issue is not addressed, try checking the parts such as the console button, the wiring, and the servo motor. If any parts are damaged, you most likely need to replace them.
Why Won’t My Electric Parking Brake Release?
There are several reasons why the electric parking brake of your car won’t release. There could be a blown fuse or faulty parts. The faulty parts can include the controller, the sensor, the switch, the wiring, and the motor. Check each one of them and identify which one needs replacement.
Are Electronic Parking Brakes Reliable?
While the traditional handbrake has always been a reliable system, the electronic parking brake is more reliable. It can be particularly reassuring for drivers who tow. The electric parking brake releases automatically as soon as the vehicle drives off.
Do Electronic Parking Brakes Automatically Disengage?
Most electric parking brakes automatically disengage as the vehicle pulls away.
In Closing: Electric Parking Brake Problems
To sum it up, there are two ways of knowing if your vehicle is experiencing an electric parking brake problem. First, you will notice the parking brake light flashing.
Second, a message on the dashboard will appear. These are sufficient warnings that your vehicle needs a parking brake service immediately.
Here are the steps to troubleshoot an electric parking brake problem:
- Park the Vehicle
- Loosen the Affected Wheel’s Lug Nuts
- Remove the Wheel
- Find the Electrical Connector to the Caliper
- Check the Power Supply Received By the Electric Actuator Motor
- Check the Voltage Reading
- Test the Actuator
- Put Everything Back in Place
You may also reset the system first if the system temporarily malfunctions only. Also, have the system parts checked too. There might be a faulty button, wiring, or motor that needs replacement.
Fixing electric parking brake problems is not that hard. Some vehicle owners fix the system on their own. But it is still best to bring your vehicle to a professional mechanic or car dealer and let them fix the issue.


![Read more about the article Car Idling Rough [Causes and How to Fix]](https://roadsumo.com/wp-content/uploads/2021/12/car-idling-rough-300x200.jpg)