
Leather seats may give your car’s interior a fancy, classy feel, but it requires regular care and maintenance to preserve that look. The fact is that leather tends to crack and wear out over time. And as expensive as it is to get leather car seats in the first place, so much so is the cost of repairing or replacing them. So, how do you fix cracked leather seats in a car?
To fix cracked leather seats in a car, follow these steps:
- Read the Leather Car Repair Kit Instructions Carefully
- Clean the Leather Car Seat
- Apply Denatured Alcohol
- Use Microfiber Cloth
- Remove Cracked Surfaces Using Sandpaper
- Apply the Leather Repair Kit
- Open the Car Doors and Windows
Read on to learn more about how to fix car leather seats with cracks, how to prevent them from cracking, and more.
How to Fix Cracked Leather Seats in the Car
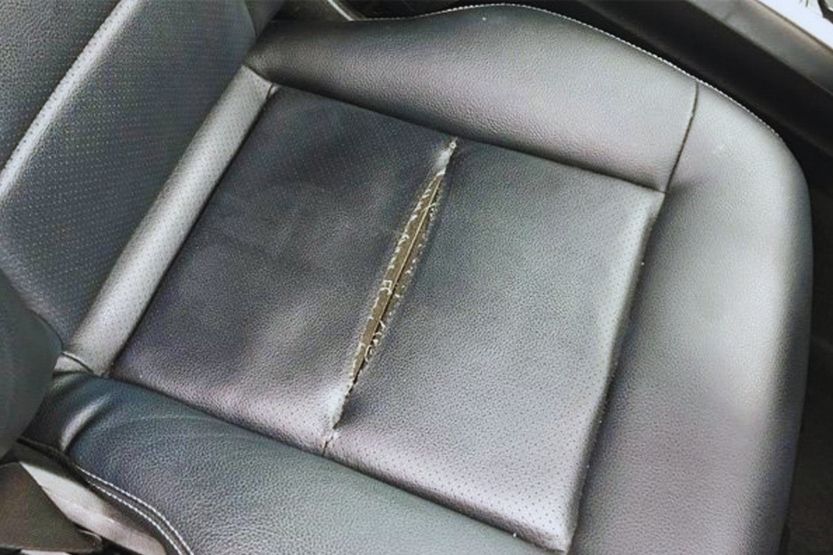
It should be possible for you to know how to fix cracked leather seats in the car on your own. You can even restore them to their previous state without costing you too much.
Even if you take measures to protect your leather seats, such as putting seat covers over them, they will eventually wear and crack in the long run. But given the proper care, you may still be able to maintain their look and prevent significant damage. Also, when it becomes necessary to have them fixed, you may be able to repair them on your own by following the steps below.
Materials
- Car leather repair kit: If it comes with leather dye, the color should match that of your leather seat
- Cleaning cloth
- Microfiber cloth
- Warm water
- Dish soap or mild soap
- Paper towels
- Denatured alcohol
- Fine-grit sandpaper
- Leather car seat patch
- Leather thread
- Scissors
- Vacuum cleaner
Procedure
- Read the Leather Car Repair Kit Instructions Carefully
- Clean the Leather Car Seat
- Apply Denatured Alcohol
- Use Microfiber Cloth
- Remove Cracked Surfaces Using Sandpaper
- Apply the Leather Repair Kit
- Open the Car Doors and Windows
1. Read the Leather Car Repair Kit Instructions Carefully
Leather repair kits are relatively affordable and can be bought from car repair shops, hardware stores, and supermarkets. Be sure to buy a brand with good quality ingredients and easy to apply. The application instructions may vary depending on the brand, so carefully read the instructions and follow them accordingly.
2. Clean the Leather Car Seat
Before applying the leather repair kit, clean off all traces of dirt, debris, and oils from the car seat:
- Use a vacuum cleaner, particularly with a vacuum crevice tool, to suck out bits of dirt that may be stuck within the nooks and crannies of the seat.
- Then take a small cleaning cloth, wet it with warm water and soap, and carefully wash the area in small circular motions.
- When you’ve finished wiping, thoroughly rinse the cloth with warm water only.
- Dry the leather seat surface by patting it with paper towels.
3. Apply Denatured Alcohol
- Get a cleaning cloth; pour enough amount of denatured alcohol on it.
- Then, run the cloth across the cracked areas of the seat.
- Rub it very slowly while maintaining a firm stroke.
- Afterward, use paper towels to pat the area dry.
4. Use Microfiber Cloth
Remove all remaining bits of dirt with a dry microfiber cloth.
5. Remove Cracked Surfaces Using Sandpaper
- Take a large sheet of sandpaper.
- Cut out a small piece of sandpaper.
- Use it to sand away the cracked areas of the leather seat.
- Then use the vacuum cleaner to remove any leftover dirt and the microfiber cloth to wipe off any moisture that might have seeped into the cracks.
6. Apply the Leather Repair Kit
After cleaning the cracked areas, you may liberally apply the leather repair kit product onto the leather car seat. Most kits come with the leather dye used to conceal parts where you applied the product. Make sure that the leather dye of the kit you’re buying matches the color of your leather seat.
Also, if you are not sure about the leather kit you’re using, try it out first in a discreet area, such as the back part of the seat, before you apply it to the front.
7. Open the Car Doors and Windows
After applying the leather repair kit, park the car in a garage or enclosed area. Leave the doors and windows open to allow the treated area to dry.
Car Headliner Repair – Step to Fix Sagging Liner
How to Fix Leather Car Seats with Minor Cracks and Tears
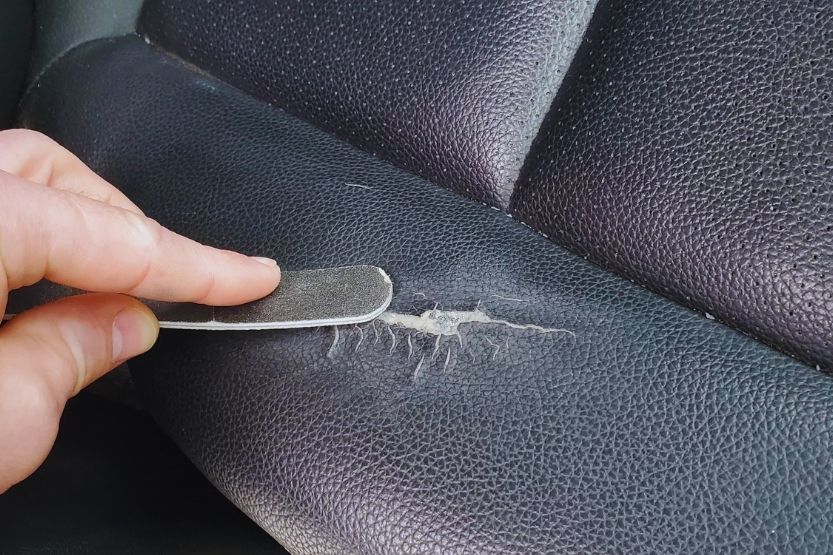
You can also use a leather repair kit to remove minor cracks and tears on your leather car seat. You can also stitch together torn leather edges with leather thread. If the tear is too large, you can use a leather car seat patch.
Materials
- Patch or strip (Leather)
- Thread (Leather)
- Leather needle
- Leather putty
- Scissors
- Thimble
- Leather dye
- Liquid leather (Optional)
Procedure
- Cut Away All Loose Thread or Material
- Stitch the Torn Edges
- Use a Leather Strip or Patch
- Use Liquid Leather
- Apply Leather Dye to the Affected Surfaces
1. Cut Away All Loose Thread or Material
With a pair of scissors, remove any loose hanging thread or material along the area. Then clean the affected area in the same way as the steps given above.
2. Stitch the Torn Edges
- Stitch the open edges using a special upholstery needle and leather thread.
- Thread the needle and place it on the underside of one of the torn edges.
- Run it across to the other torn edge and make a stitch before you pull it back to the side where you started from.
- Push the needle using a thimble.
- Repeatedly run the needle across the edges back and forth until the tear is closed.
- Remember that the smaller the stitches, the less noticeable the repair. After you’re done stitching and inspecting the results, tie the knot off the leather’s underside. That way, it will not be visible.
3. Use a Leather Strip or Patch
If the tear is too large and the edges too far apart to be sewn together, you can make use of a leather strip or leather patches:
- Make sure that the color of the strip or patch is the same as that of your leather seat.
- Place the leather strip or patch either over the tear or under it.
- Stitch the leather in place using the stitching method mentioned above.
- Alternatively, you may also use a leather adhesive or glue to hold the leather patch or strip in place. Position the piece of leather under the tear, brush the adhesive lightly on the tear (especially on the edges), then press down on the leather patch or strip.
4. Use Liquid Leather
Liquid leather is a synthetic leather product that you can apply on small rips, cracks, and holes. You can purchase liquid leather from upholstery and leather car seat shops.
5. Apply Leather Dye to the Affected Surfaces
Once you have finished with the repairs, apply leather dye to help restore the previous unspoiled appearance of your leather seat:
Again, how to fix cracked leather seats in the car? You can fix a cracked leather seat by brushing a liquid adhesive around the tears’ edges. Then, press them. After drying, smoothen the rough surfaces using sandpaper. Wipe any residue with a wet cloth, then dry the surface with another cloth. In case of gaps, use leather putty.
How to Fix Leather Car Seats with Large Rips and Holes
Using a leather patch is the most effective way to fix a large hole or rip on your leather car seat. Aside from covering any hole, it also prevents rips and holes from getting bigger:
Procedure
- Thoroughly Clean the Affected Area
- Apply the Leather Patch
- Sand the Area
- Apply Leather Dye
1. Thoroughly Clean the Affected Area
Before applying the leather patch, ensure that the damaged area is cleaned thoroughly and free from dirt. Follow the same cleaning steps as previously given.
2. Apply the Leather Patch
Cut a larger leather patch measuring around three times bigger than the hole on the leather seat, then insert the patch under the hole. Make sure that the patch is arranged to cover the area. Either sew or apply a strong glue or leather adhesive to fix the patch firmly in position.
3. Sand the Area
Use sandpaper with the finest grit to sand off the area. Then wipe off any dirt with a microfiber cloth.
4. Apply Leather Dye
Apply the leather dye to the patched area. Then, open the doors and windows of your car to dry out the treated area.
How to Prevent Cracked Leather Seats in the Car
Your leather seats will eventually crack and tear over time, and there is no way to protect them completely. But it is at least possible to lessen the damage by avoiding certain conditions that may hasten it.
Here are some tips on how to prevent having cracked leather seats in the car:
- Avoid Parking in the Sun for a Long Period of Time
- Avoid Sharp or Bulky Objects
- Wash and Condition Your Car Seats Regularly
Let’s discuss each of these points briefly:
1. Avoid Parking in the Sun for a Long Time
Parking your car under the sun for extended periods without any form of protection from ultraviolet rays is sometimes unavoidable. But for sure, you know that it can eventually cause cracks and discoloration on your leather seats.
Refrain from parking your vehicle in the sun as much as possible. But if you are unable to do so, use a sun shield to protect your car’s interior, especially the leather seats. Although not as effective as sun shields, tinted windows also provide adequate protection from the sun’s rays.
2. Avoid Sharp or Bulky Objects
Aside from UV rays, another thing to avoid is sharp or bulky objects which may cause damage to your leather seats.
Always be mindful of the types of materials that you are transporting in your car. For instance, avoid placing heavy-duty tools on the car seats while in transit.
Tools with sharp edges like saws, screwdrivers, and claw hammers are likely to tear through the leather. Even blunt tools like wrenches are also capable of inflicting a considerable amount of damage in the event of a swerve or sudden stop. Other objects that you should not put on your seats are bulky containers such as metal boxes or pet carriers.
In general, refrain from carrying any sharp or hard-edged cargo onto the car seats. But if unavoidable, at least place a padded blanket over the seat for protection. In addition, you should also be wary of the smaller objects that you keep in your pockets, such as keys, which may scratch your seats if you’re not careful when sitting down.
3. Wash and Condition the Car Seats Regularly
As a car needs regular maintenance, so do your car seats.
You begin by giving your leather seats a thorough vacuuming. Make sure to use a special extension so that you can vacuum the nooks, crannies, and hard-to-reach edges of the seats for any traces of dirt and crumbs that are stuck inside.
The next step is to generously apply a layer of leather conditioner, wiping it into the seat until evenly spread. While you are doing this, do not let the conditioner form into a pool. The application of leather conditioner moisturizes your seats to give them added protection from cracking. It also protects them from ultraviolet rays and discoloration.
Conclusion – How to Fix Cracked Leather Seats in the Car
To fix cracked leather seats in a car, follow these steps:
- Read the Leather Car Repair Kit Instructions Carefully
- Clean the Leather Car Seat
- Apply Denatured Alcohol
- Use Microfiber Cloth
- Remove Cracked Surfaces Using Sandpaper
- Apply the Leather Repair Kit
- Open the Car Doors and Windows
Leather seats may add a touch of class to the look of your car, but they are as delicate just as they are elegant. But now that you know how to fix car leather seats that have cracked, you will be able to deal with whatever damage they may sustain and keep them looking as good as new.


![Read more about the article Stainless Steel License Plate Screws [12 Best]](https://roadsumo.com/wp-content/uploads/2022/01/stainless-steel-license-plate-screws-2-300x200.jpg)
![Read more about the article What Is a Fender on a Car? [Fender Car Part Explained]](https://roadsumo.com/wp-content/uploads/2021/07/car-fender-300x200.jpg)