
Jumping a starter solenoid is a simple process that can be done with a few basic tools. The starter solenoid is a critical component of a vehicle’s starting system.
When the ignition key is turned, the solenoid sends an electrical signal to the starter motor, which then cranks the engine. If the solenoid fails, the vehicle will not start.
To jump a starter solenoid, there are two methods that can be used. The first method involves using a jumper cable and a donor car to connect the dead starter to a working battery. The second method involves using a screwdriver to contact the starter’s smaller terminal.
Before attempting either method, it is important to locate the starter solenoid in the vehicle. Generally, it is near the starter motor or battery, but it may vary depending on the make and model of the vehicle.
It is important to note that jumping a starter solenoid should only be done as a temporary fix. If the solenoid is failing, it should be replaced as soon as possible to avoid any further issues.
Additionally, if the vehicle continues to have starting issues even after jumping the solenoid, there may be other underlying issues that need to be addressed.
Understanding the Starter Solenoid

As per JD Power, the starter solenoid is a crucial component in the starting system of a vehicle. It is responsible for transmitting power from the battery to the starter motor. The solenoid is an electromechanical device that uses a magnetic field to operate a switch.
When the ignition key is turned, an electric current flows through the coil of the solenoid, creating a magnetic field that pulls a plunger or lever. This action closes the circuit between the battery and the starter motor, allowing the motor to turn the engine.
The starter solenoid consists of two main parts: the coil and the contacts. The coil is a wire wound around a metal core, which generates the magnetic field when an electric current passes through it.
The contacts are two metal plates that close the circuit when the solenoid is energized. The contacts are made of a high-quality material that can withstand the high current and voltage of the starting system.
The starter solenoid is usually located on the top or side of the starter motor. It is connected to the battery through a thick cable and to the starter motor through a thin wire. The solenoid is designed to handle high current and voltage, and it is built to last for the life of the vehicle.
If the starter solenoid fails, the vehicle may not start or may have intermittent starting problems.
Symptoms of a bad starter solenoid include a clicking sound when the ignition key is turned, the starter motor remaining on after the engine has started, and the engine starting sporadically or not at all.
In conclusion, the starter solenoid is a critical component of the starting system in a vehicle. It uses a magnetic field to operate a switch that connects the battery to the starter motor.
Understanding how the solenoid works and recognizing the symptoms of a bad solenoid can help vehicle owners troubleshoot starting problems and keep their vehicles running smoothly.
Identifying the Components
Jumpstarting a starter solenoid requires knowledge of the various components involved in the starting system of a car. This section will identify the car and engine components, solenoid and starter components, and battery and electrical components that are relevant to the process.
Car and Engine Components
The starter system of a vehicle is responsible for cranking the engine, which is necessary to start the car. The engine is connected to the starter motor by the flywheel, which is located at the rear of the engine. The starter motor is attached to the fender well and is powered by the battery.
Solenoid and Starter Components
The starter solenoid is an electromechanical device that is responsible for engaging the pinion gear of the starter motor with the flywheel of the engine.
The solenoid is connected to the starter motor and the battery by wires. The solenoid valve is a component that controls the flow of hydraulic fluid to and from the solenoid.
Battery and Electrical Components
The battery of a car is responsible for providing the electrical current that powers the starter motor. The battery is connected to the starter solenoid by a positive battery cable and a negative battery cable.
The positive terminal of the battery is connected to the positive battery cable, which is then connected to the starter solenoid. The negative terminal of the battery is connected to the chassis of the car, which provides a ground for the electrical system.
To determine if the battery is providing enough power to the starter motor, a voltmeter can be used to measure the voltage of the battery. If the voltage is low, the battery cable may need to be replaced. If the voltage is high, the starter motor may need to be replaced.
In summary, identifying the components of the starter system is crucial to jumpstarting a starter solenoid. The car and engine components, solenoid and starter components, and battery and electrical components all play a role in the starting system of a car.
By understanding how these components work together, it is possible to troubleshoot and fix any issues that may arise.
How Can You Tell If Your Solenoid Is Bad?

The starter solenoid is an essential component of the starting system in a vehicle. It is responsible for engaging the starter motor, which in turn cranks the engine.
If the solenoid goes bad, the engine won’t start, and you may hear a clicking noise or experience slow cranking. Here are some signs that your solenoid may be bad:
- Clicking noise: If you turn the key in the ignition and hear a clicking noise but the engine doesn’t start, it may be due to a bad solenoid. The clicking noise indicates that the solenoid is trying to engage the starter, but it’s not working properly.
- Dead battery: A weak or dead battery can also cause problems with the solenoid. If the battery is not providing enough power to the starter, the solenoid may not engage properly.
- Slow cranking: If the engine cranks slowly or takes longer than usual to start, it may be due to a bad solenoid. The solenoid may not be providing enough power to the starter motor, which can cause slow cranking.
- Bypassing: If you bypass the solenoid by jumping the starter motor directly to the battery and the engine starts, it may be due to a bad solenoid.
- Running: If the engine starts but dies immediately, it may be due to a bad solenoid. The solenoid may be engaging the starter motor, but not disengaging it after the engine starts.
- Weak battery: A weak battery can also cause problems with the solenoid. If the battery is not providing enough power to the solenoid, it may not engage properly.
If you experience any of these symptoms, it’s important to have your vehicle inspected by a qualified mechanic. They can diagnose the problem and determine if the solenoid needs to be replaced.
What to Do Before Jumping a Solenoid
Before attempting to jump a starter solenoid, there are a few things that should be done to ensure safety and prevent further damage to the vehicle.
Firstly, it is important to make sure that the mechanic has a rubber handle on the screwdriver or any other metal object that will be used to jump the solenoid. This is to prevent any electrical shock from occurring.
Secondly, the mechanic should take a deep breath and remain calm. Jumping a starter solenoid can be a bit intimidating, but it is a relatively simple process that can be done with ease.
Thirdly, the mechanic should locate a suitable ground point for the vehicle. This is usually a metal surface that is not painted or coated in any way.
Lastly, the mechanic should use electrical tape to cover any exposed wires or connections. This will prevent any accidental short circuits from occurring.
By following these simple steps, the mechanic can ensure that jumping the starter solenoid is a safe and easy process.
How to Jump a Starter Solenoid
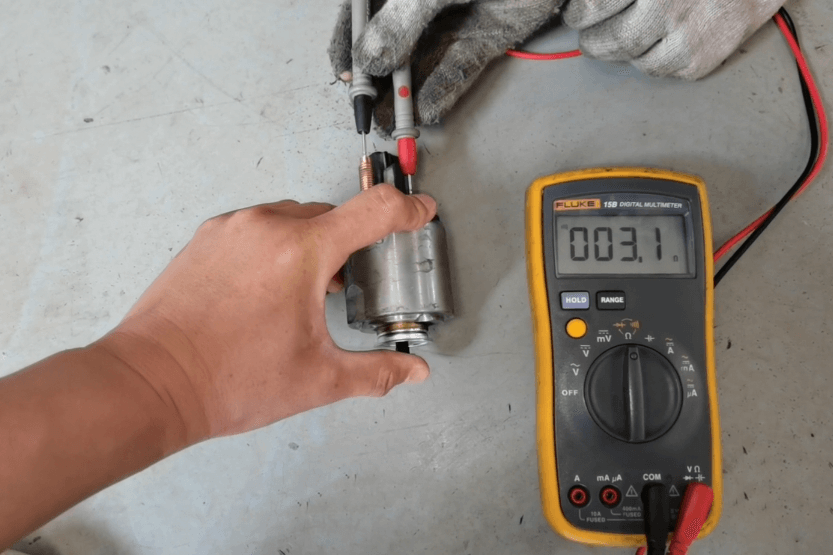
Jumping a starter solenoid is a quick and easy way to diagnose a faulty starter or solenoid. There are three common methods to jump a starter solenoid: using a screwdriver, using a jumper cable, or using a jumper wire.
Using a Screwdriver
Jumping a starter solenoid with a screwdriver is the most common method. Here are the steps to follow:
- Pop open the hood and locate the starter solenoid. It is usually near the starter motor or battery.
- Make sure that the car is in Neutral or Park and the parking brake is engaged.
- Take a screwdriver with an insulated handle and touch the metal shaft to the positive battery terminal.
- Touch the metal shaft of the screwdriver to the small post on the starter solenoid. This will complete the circuit and start the engine.
Be careful when using this method as it can be dangerous if not done correctly. Make sure to use an insulated screwdriver and keep your body away from moving parts.
Using a Jumper Cable
Jumping a starter solenoid with a jumper cable requires a donor car with a working battery. Here are the steps to follow:
- Park the donor car next to the disabled car and turn off both engines.
- Connect one end of the positive jumper cable to the positive terminal of the donor car battery.
- Connect the other end of the positive jumper cable to the positive terminal of the disabled car battery.
- Connect one end of the negative jumper cable to the negative terminal of the donor car battery.
- Connect the other end of the negative jumper cable to a metal part of the disabled car’s engine.
- Start the donor car and let it run for a few minutes.
- Try to start the disabled car. If it doesn’t start, try again after a few more minutes.
Make sure to follow the correct order when connecting and disconnecting the jumper cables to avoid damaging the electrical system.
Using a Jumper Wire
Jumping a starter solenoid with a jumper wire is similar to using a screwdriver but requires a wire instead. Here are the steps to follow:
- Pop open the hood and locate the starter solenoid. It is usually near the starter motor or battery.
- Make sure that the car is in Neutral or Park and the parking brake is engaged.
- Connect one end of the jumper wire to the positive battery terminal.
- Touch the other end of the jumper wire to the small post on the starter solenoid. This will complete the circuit and start the engine.
Make sure to use a wire with proper insulation to avoid electric shock.
In conclusion, jumping a starter solenoid is a simple and effective way to diagnose a faulty starter or solenoid. Always follow the correct safety procedures and make sure to use the correct method for your situation.
Potential Risks and Precautions
Jumping a starter solenoid can be a dangerous procedure if not done correctly. It is important to take the necessary precautions to avoid injury or damage to the vehicle. Here are some potential risks and precautions to keep in mind:
- Shock: When working with the electrical system of a vehicle, there is always a risk of electrical shock. Before attempting to jump the starter solenoid, make sure the engine is turned off, the keys are removed from the ignition, and the battery is disconnected.
- Sparks: When making a connection between the battery and starter solenoid, there is a risk of sparks. Sparks can ignite flammable materials and cause fires. To reduce the risk of sparks, make sure the battery and starter solenoid terminals are clean and free from corrosion.
- Burn out: Jumping a starter solenoid can cause the starter motor to overheat and burn out. To avoid burn out, make sure the battery is fully charged and in good condition before attempting to jump the starter solenoid.
- Dangerous procedure: Jumping a starter solenoid is a dangerous procedure that should only be attempted by experienced mechanics. If you are not comfortable working with the electrical system of a vehicle, it is best to leave it to the professionals.
To reduce the risk of injury or damage to the vehicle, it is important to take the necessary precautions when jumping a starter solenoid. Always wear protective gloves and eye protection, and make sure the area around the vehicle is clear of any flammable materials.
If you are unsure about any aspect of the procedure, consult the vehicle owner’s manual or a qualified mechanic before attempting to jump the starter solenoid.
Post-Jump Procedures

After successfully jumping the starter solenoid, it is important to follow some post-jump procedures to ensure that everything is working properly and to prevent any damage to the vehicle.
Install the Starter
If the starter was removed during the jump process, it should be reinstalled properly. This involves aligning the starter with the mounting bolts and tightening them to the manufacturer’s recommended torque specifications.
It is also important to reconnect any wires or cables that were disconnected during the process.
Check for Corrosion
Corrosion can build up on the battery terminals and starter connections over time, which can cause poor electrical conductivity and prevent the vehicle from starting.
After jumping the starter solenoid, it is a good idea to check for any signs of corrosion and clean the affected areas with a wire brush or sandpaper if necessary.
Inspect Wire Connections
It is important to inspect all wire connections related to the starter and solenoid to ensure that they are tight and secure. Loose connections can cause electrical problems and prevent the vehicle from starting.
If any connections are loose, they should be tightened to the manufacturer’s recommended torque specifications.
Test the Vehicle
After completing the post-jump procedures, it is important to test the vehicle to ensure that it is starting properly and that there are no other issues. If the vehicle is still not starting, it may be necessary to have it inspected by a qualified mechanic to diagnose and repair any underlying issues.
Okay, here’s the deal, and you can take it from me as a mechanic: after you’ve given your ride a jumpstart, following these simple steps is key to making sure that starter solenoid keeps doing its job and avoiding any pesky issues down the road.
In Summary
Jumping a starter solenoid can be a useful skill to have for any car owner. It can help you diagnose whether the problem is with the starter or the solenoid. By following the steps outlined in this article, you can safely jump the solenoid and get your car started.
To jump a starter solenoid, you can use a jumper cable and a donor car or a screwdriver. The first step is to locate the starter solenoid in your vehicle. Generally, it is near the starter motor or battery, but it may vary. Once you have located it, you can proceed with the jumping process.
If you are using a jumper cable and a donor car, you will need to connect the dead starter to a working battery. Make sure both cars are turned off and in Park or Neutral. Attach one end of the wire (or jumper cables) to the positive terminal of the working battery.
Touch the other end of the wire (or jumper cables) to the START terminal on the Starter Solenoid of the disabled car.
If you are using a screwdriver, make sure both cars are turned off and in Park or Neutral. Attach one end of the wire (or jumper cables) to the positive terminal of the working battery.
Touch the other end of the wire (or jumper cables) to the START terminal on the Starter Solenoid of the disabled car. Once you have made the connection, turn the key to the ON position and listen for the engine to turn over.
Remember to exercise caution when jumping a starter solenoid. Always make sure both cars are turned off and in Park or Neutral before proceeding. If you are unsure about the process, it is best to seek the help of a professional mechanic.


![Read more about the article OBD2 Scanners [8 Best Picks]](https://roadsumo.com/wp-content/uploads/2022/01/obd2-scanners-300x200.jpg)