
Many car owners overlook the valve lash despite its importance in optimal engine performance. Proper setting is crucial for combustion. What is a valve lash? How do you adjust it?
A valve lash is the opening between the tip of the valve stem and the rocker arm. It regulates the valve’s opening and closing, which improves engine airflow and durability. At the same time, it also maximizes fuel efficiency and prevents annoying noises.
To ensure the peak functionality of the valve lash, proper adjustment is necessary. To do this, start by installing the rocker arm, and follow it up by applying a lubricant. Next, tighten the adjusting nut and finish by setting the valve. The specific procedure depends on whether there is a hydraulic or solid lifter.
Read on to learn more about the valve lash, including what it does and how to set it properly.
What Is a Valve Lash?
When looking at the different parts of an engine, the valve lash is one component that does not get much attention. It might look simple, but it has a vital role in maximizing engine performance and fuel economy, among others.
The valve lash is the gap that you will find in the ends of both the valve stem and rocker arm. Also called valve clearance, it is often 10/1,000 of an inch, but this will depend on the specific engine type.
With more clearance than necessary, the valves will create an audible sound. Over time, this can result in serious damage to the rocker arms, camshaft lobes, and valves. The engine will also misfire continuously.
Upon leaving the factory, a new car’s engine has a proper alignment. As the mileage increases, the engine’s patterns change. While this is a normal resettling, this also causes a period realignment of the valves. These valves should open and close precisely. Without proper adjustment, the valves will become more inefficient.
Too much clearance causes the engine to lose compression, which is what results in poor performance. The damage in this situation is not as worse as what you would experience when you have excessively tight valves.
On the other hand, when the clearance is lesser than necessary, the valves will not close. By slowing down the speed of valve closing, cylinder compression is minimized. It will result in overheating. In turn, the engine loses power. The engine will also be noisier because of the loose components.
How to Adjust the Valve Lash
You don’t need to be a mechanic to know the basics of valve lash adjustment. Below is a step-by-step guide on how you can do it. We’ll start with the basics and follow up on how to do it, depending on the type of camshaft you have.
Take note that the valve lash adjustments will vary depending on the manufacturer’s recommendations and other factors. For instance, cheaper parts and higher RPM will require more frequent adjustments:
To Start With
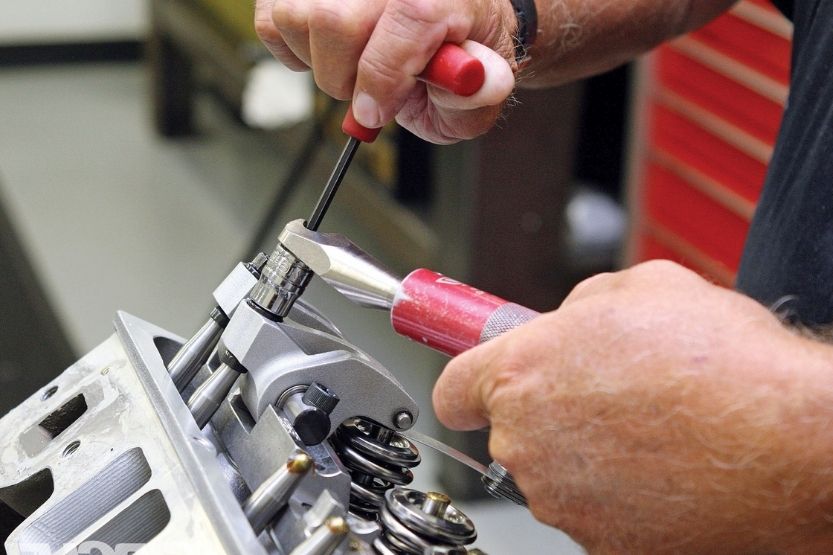
- Install the rocker arm. Look for the guide plate in the assembly, making sure that the pushrods are in position. See to it as well that you pre-oil or prime the pushrod for optimal functionality;
- Locate the tip of the valve stem and lubricate. After this, you can now install the stud on the rocker arm;
- Assemble the rocker arm. As you do this, avoid engine rotation to prevent the pushrod from accidentally bending;
- Follow up by tightening the adjusting nut. Do this until there is no more lash in the pushrod but it must still be spinning using your fingers. Repeat this procedure until you are done with all the pushrods and after installing all the rocker arms in the assembly; and
- Finish by setting up your valve lash. When setting it up, do it per cylinder depending on the firing order. The dampener bolt must be fixed in the crankshaft. Use your hand for turning the engine depending on the normal rotation.
For Hydraulic Lifters
It pumps the lifter cup to eliminate the lash in a system. With a close valve, the hydraulic lifter’s plunger spring covers the valvetrain. The oil enters the plunger through the feed hole. It flows continuously until the bottom.
Using a hydraulic lifter offers a plethora of benefits, including the following:
- It requires minimal maintenance,
- Operates quietly because of the absence of a lash,
- Functions smoothly because of valve control precision, and
- Automatically compensates for contraction and expansion.
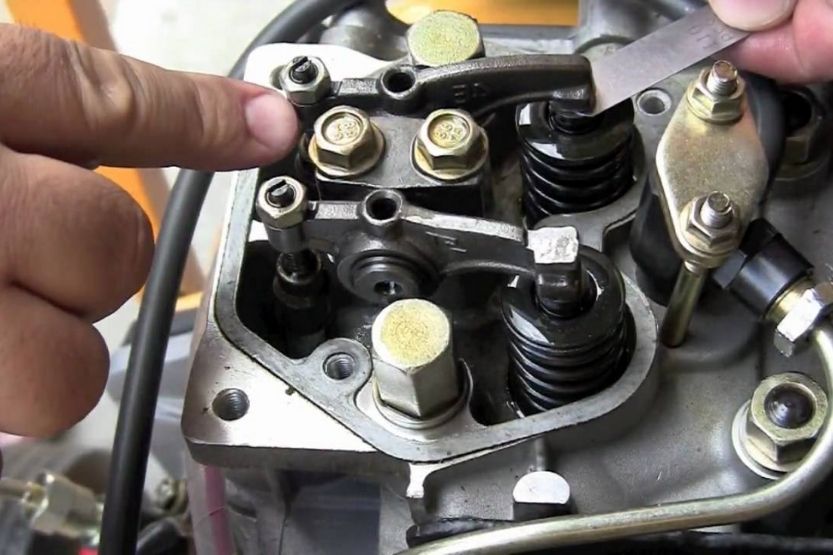
- Upon the opening of the exhaust valve’s first cylinder, slightly loosen the adjusting nut of the intake valve. Spin the pushrod until feeling the rocker arm’s lash;
- Adjust the nut until it is tight enough and there is no more slack in the pushrod and rocker arm.
- Use your fingers to slightly turn the pushrod. To know if is tight, you should feel a resistance, which is known as the zero lash;
- Keep turning the adjusting nut to achieve the lifter, pushrod, and rocker arm’s pre-load. In a conventional hydraulic lifter, this should be anywhere from .30 to .60. Keep on doing this until you are done with all intake valves depending on the firing order of the cylinder; and
- After setting the right valve lash of the intake valves, do the same on the engine’s exhaust valves. The procedure is the same as you have done above. But first, you must turn over the engine until moving the intake pushrod. Start adjusting until reaching the maximum lift.
For Solid Lifters
Also known as mechanical camshaft, the main difference with a hydraulic lifter is that the former does not compress. Maintaining its proper tolerance is a must for the lifter adjustment. The clearance or lash is pre-determined. It is rigid compared to hydraulic lifters, which accommodate clearance in the valve train.
The process for adjusting a solid lifter is almost similar to that of a hydraulic lifter. You also need to do it one at a time. You must do it depending on the assembly’s firing order.
After achieving zero lash, loosen the adjusting nut through the intake valve. You can feel the rocker arm’s lash until feeling the rocker arm’s lash. Look at the spec card to see the proper lash adjustment. Overtightening will result in camshaft damage, so make sure to follow the manufacturer’s recommendations.
Correct the thickness of the feeler gauge by spinning down the intake rocker nut. Tighten until you feel that there is a slight resistance.
Symptoms of Valve Lash Setting Problems

Do you need to adjust the valve lash? The best way to answer this question is to look for different problems, including the following:
1. Unusual Sound
Watch out for an unusual sound. You will hear a ticking or tapping noise to determine any valve adjustment issue. The louder the sound, the more serious the problem is. With a proper adjustment, it must be quiet. However, note that if there is only a light sound, it does not necessarily mean it is problematic.
2. Difficult to Idle Car Engine
The car engine will find it difficult to idle. This is a result of a late valve opening. When there is a delay, fuel chokes off. With the flow restriction in the engine, idling can end up being problematic.
3. Higher than Normal Fuel Consumption
Watch out for your fuel consumption. If it is higher than normal, it can indicate several problems, and one of the possibilities is that the valve lash needs an adjustment.
4. Exhaust Smoke
The appearance of exhaust smoke can also be indicative of the need for valve lash adjustment. There will be more smoke than usual.
5. Valve Train Complication
Check the components of the valve train. Any complication with the latter could also mean that the valve lash has an issue. The camshaft, lifters, pushrods, and springs are some parts that can have an issue.
6. Other Symptoms
However, in many instances, there can be other problems. For instance, a clicking noise can indicate that the rocker arm has loosened. Power loss, meanwhile, can be because of valve spring wear.
Burnt Valve Symptoms, Causes, and How to Fix
Tips for Setting a Valve Lash
Aside from following the steps for valve lash adjustments, take note of the tips mentioned below:
1. Look for a Sweet Spot
Look for a sweet spot, which will require running the engine to find what works best. This will maximize the durability of the valve lash while making sure that it does not compromise power.
2. Make Sure the Engine Is Cold
Before starting with the adjustment, see to it that the engine is cold. Meanwhile, when inspecting, it is best if the air temperature is ambient. It provides a better indication of the lash change in a cylinder.
3. Consult Your Manual
Consult the manual from the manufacturer. The spec card gives you a precise idea of how much adjustment is necessary. Being too tight or too loose will harm the overall engine performance.
4. One Side At a Time
Do it one side at a time. Avoid rushing the procedure as it will compromise the outcome. After fixing the first side, test it, and once you are sure that it is working, you can move to the next.
5. Be Consistent
Consistency is the key. During the valve lash set up, check the adjustments making sure that they are the same. Otherwise, it is difficult to determine if there is a problem in one of the cylinders.
6. Do a Weekly Inspection
Perform a weekly inspection of the valve lash. This way, you will know when there is a problem immediately to adjust it accordingly. Waiting too long will worsen the problem.
7. Work With a Pro
If you are not confident with your skills, it is best to work with a pro. While it is generally an easy task, it cannot be obvious for someone who is not a handyman. It is best to trust the knowledge of the experts.
Valve Lash FAQs
Before we conclude, we’ll answer a few questions some of you might have about valve lash adjustments:
When Should I Adjust the Valve Lash?
There is no specific time or mileage that is best indicative of the need for an adjustment. Instead, this will depend on the appearance of the symptoms. As mentioned earlier, the most common sign is a loud noise when starting the engine.
How Do I Check Valve Clearance?
To know if there is already a need for adjustment, inspect the valve clearance. Measure the space between the exhaust and intake valves. You will need a thin feeler gauge for this task. Ensure the proper position of the camshaft during measurement for more accurate results.
What Can a Valve Lash Adjustment Do?
Overall, it can tune the engine performance. Some of the improvements that it can deliver include increasing top-end horsepower and low-end torque. It will also eliminate the clanking noise, which is most evident when the engine starts.
Can I Do Valve Lash Adjustment on My Own?
It is a simple task, so we do not see any problem if you attempt to adjust yourself. Nonetheless, it is easy only for someone who has handy experience in engine repair and maintenance. Otherwise, you might end up causing more problems than providing a solution.
Conclusion – Valve Lash Adjustment
Knowing how to adjust the valve lash is one thing that a car enthusiast must know. It might seem intimidating at first, but it is an easy task if you know the basics. This car maintenance procedure requires only simple steps and basic tools.
You must assemble the rocker arm, lubricate the end of the rocker arm and valve stem, rotate the adjusting nut until it is finger tight, and set the lash. The last process, however, depends on whether you have a hydraulic or solid camshaft.
Aside from the proper adjustment, keep in mind some important things. For instance, you must find the sweet spot, follow the manufacturer’s suggestions, set the lash when the engine is cold, and inspect weekly to remedy the problem as soon as possible.
Related reading:
What Happens When Cam Phasers Go Bad?
CV Shaft [CV Axle Shaft Explained – And When to Replace]
Charge Pipe [What Is It and Why Use It?]


![Read more about the article What Causes a Catalytic Converter to Go Bad? [6 Main Causes]](https://roadsumo.com/wp-content/uploads/2022/01/what-causes-a-catalytic-converter-to-go-bad-300x200.jpg)
![Read more about the article Car Idling Rough [Causes and How to Fix]](https://roadsumo.com/wp-content/uploads/2021/12/car-idling-rough-300x200.jpg)
![Read more about the article Jiffy Lube Service Price List [Complete]](https://roadsumo.com/wp-content/uploads/2022/07/Jiffy-Lube-service-price-list-300x200.jpg)