
If you own an old vehicle, your air conditioning system most probably requires the R12 refrigerant. Unfortunately, using R12 is already being stopped due to environmental concerns. So, is R12 to R134a conversion possible?
Converting your car’s R12 air conditioning system to an R134a system can be done using the factory method. The factory method allows you to replace all worn-out parts due to age. At the same time, you will get the best air conditioning performance too. The downside of this procedure is that it is time-consuming and costly.
Read on to learn more about the R12 to R134a conversion and recommended R12 to R134a conversion kits.
R12 to R134a Conversion – Required Supplies
The following are the materials and supplies you need to successfully convert from R12 to R134a:
- Air conditioning flush kit
- R134a retrofit kit consisting of R134a adapters, port caps, oil, and retrofit label
- Complete hydrogenated acrylonitrile-butadiene rubber (HNBR) O-ring kit for the vehicle
- R134a pressure switches
- Barrier style hoses for vehicles older than the 1990s
- R134a orifice tube
- New R134a accumulator/dryer
- R134a refrigerant
R12 to R134a Conversion – Factory Method
The following are the step by step instructions for converting from the R12 to the R134a refrigerant using the factory method:
- Proper Discharge of the R12 Refrigerant
- Removal of the Mineral Oil
- Application of Oil
- Swapping Out
- Replacement of the O-rings
- Making Use of the Vacuum Pump
- Attachment of Port Adapters
- Filling the Unit with the R134a Refrigerant
- Installation of Port Caps
- Attachment of the Retrofit Label
Let’s discuss each of these steps:
1. Proper Discharge of the R12 Refrigerant
You have to discard the R12 refrigerant from the air conditioning system completely. But you might not be able to do this on your own. So, it is best to seek assistance from a licensed air conditioning professional.
It is dangerous to release the R12 refrigerant into the environment directly. In fact, this act is punishable by law. Licensed air conditioning professionals are all equipped to do this, so let’s leave this task to them.
2. Removal of the Mineral Oil
To remove the mineral oil from the air conditioning system, you have to flush the evaporator and condenser. You may do so by using the air conditioning flush kit.
The next thing to do is to flush the air conditioning high pressure and suction lines. Also, make sure that you empty the oil from the compressor.
3. Application of Oil
You may now add the new Ester or PAG oil to the evaporator, condenser, and compressor. Make sure that the oil you are pouring is in the correct viscosity.
4. Swapping Out
The next step consists of the swapping out process. You first have to swap out the high and low-pressure switches before swapping out the accumulator or drier.
Then, swap out the orifice tube. Once done, you can swap out the hoses for vehicles older than the 1990s.
5. Replacement of the O-rings
The O-rings are used for blocking a path that can allow gas or liquid to escape. These are placed into a groove and compressed between two surfaces.
O-rings that are securely installed provide no clearance for moving. It effectively blocks the pathway to seal the gas or liquid in place.
So, the next step to do is to remove the existing O-rings from the air conditioning system. Then, replace them with the barrier style HNBR O-rings.
6. Making Use of the Vacuum Pump
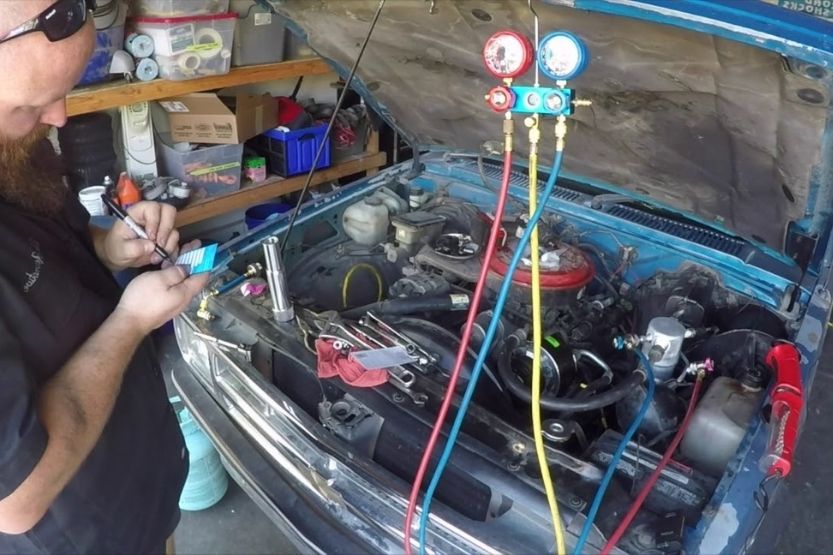
Once you are done replacing the O-rings, you may now attach the vacuum pump and manifold gauge set. Then, pull a vacuum for at least 45 minutes.
While doing so, it is advisable to check for leaks too. This is to ensure that no refrigerant will escape once you fill it in.
7. Attachment of Port Adapters
By now, you are ready to switch from the R12 to R134a adapter. Make sure to replace and attach both high and low port adapters.
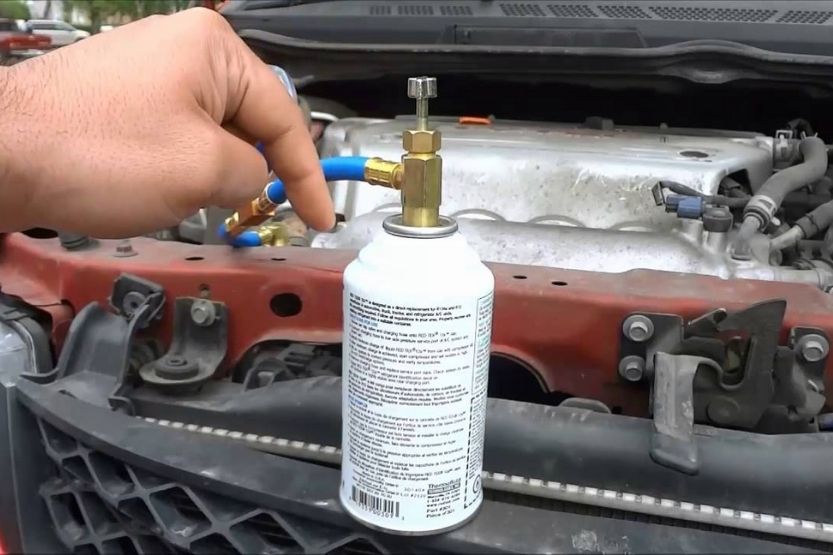
8. Filling the Unit with the R134a Refrigerant
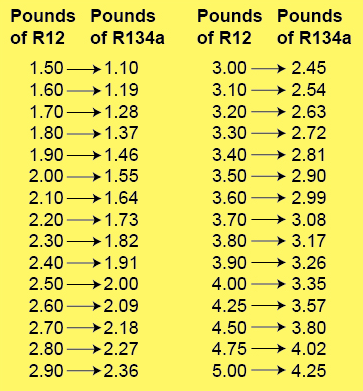
You can now fill the air conditioning system with the R134a refrigerant. The initial step to perform this is to refer to the R12 to R134a conversion chart.
Refer to this R12 to R134a conversion chart to determine the correct refrigerant capacity for your car:
9. Installation of Port Caps
After filling in the air conditioning system with the correct R134a refrigerant capacity, do not forget to cover the system. Install the port caps and make sure that this is done properly. Otherwise, it might cause the R134a to escape.
10. Attachment of the Retrofit Label
Lastly, don’t forget to attach the retrofit label to the system. This is for reference to the other technicians that will look into it in the future. It will serve as an advisory that the refrigerant of your car’s air conditioning system has already been converted from R12 to R134a.
How to Calculate Your Car’s R134a Refrigerant Capacity
The R134a refrigerant is lighter than the R12 refrigerant. Therefore, this means that you must convert the charge weight to get the correct charge during the retrofit. Once you have determined this, you can fill in the air conditioning system with the R134a refrigerant.
Using the chart above, find the correct refrigerant capacity for the current system. Then, you have to multiply the R12 charge specification by 90 percent, or 0.09. You should subtract the result to 0.25 or ¼ pound.
The R134a refrigerant does not efficiently cool the way the R12 refrigerant does. This means that even when the system is properly charged, don’t expect the air conditioning to be as cool as when it had an R12.
Do not assume that adding too much R134a will do the trick because it will not. In fact, adding too much R134a will decrease the performance of the air conditioning system even more.
R12 to R134a Conversion Kits
There are R12 to R134a conversion kits you can buy to help you perform this project efficiently. Among those available online are the following:
- Certified AC Pro Car Air Conditioner Adapter Kit
- R12 to R134A High/Low AC Fitting Port Retrofit Conversion Adapter
- InterDynamics Certified AC Pro Car Air Conditioner Adapter Kit
Let’s briefly discuss each one of them:
1. Certified AC Pro Car Air Conditioner Adapter Kit

Click here to see it on Amazon.
This R12 to R134a conversion kit features 2 adapters. It includes one low side port measuring 0.44 inches, and it also includes one high side port measuring 0.38 inches.
The said product is ideal for vehicles manufactured before 1976. It is also ideal for some late vehicle model imports. This also comes with its corresponding retrofit label.
While it is ideal for pre-1976 vehicles, 1992 vehicle owners attest that you can use this kit for 1990 models. In fact, it works well on a 1992 Isuzu truck. But to confirm this, it is best to seek professional assistance. Better yet, you may visit a car dealership to confirm this.
2. R12 to R134A High/Low AC Fitting Port Retrofit Conversion Adapter

Click here to see it on Amazon.
This R12 to R134a conversion kit consists of parts that are easy and convenient to install. It features a low air conditioning fitting conversion adapter that can help you save time and energy while installing.
The parts included in the kit are made of premium quality materials. They are made of solid copper, making them resistant to corrosion and allowing them to have good extensibility.
It is ideal for pre-1990 vehicles such as the 1982 Corvette. But it is equally ideal for vehicles manufactured in the 1990s, such as the 1991 Mazda Miata.
3. InterDynamics Certified AC Pro Car Air Conditioner Adapter Kit

Click here to see it on Amazon.
This R12 to R134a conversion kit contains 4 items. The adapters included in the kit are one high side 7/16 inch port, one high side for a 2-piece GM port, one high-side ⅜ inch port, and one low side 7/16 inch port.
The InterDynamics Certified AC Pro Car Air Conditioner Adapter Kit is one of the R12 to R134a conversion kits preferred by car owners. This is because it fits all types of cars, regardless of the car make and model. It is ideal for the 1991 Toyota Pickup, the 1989 Chevy C-1500, and the 1990 Lexus LS 400.
What Is R12 Refrigerant?

R12 is the original refrigerant. In fact, it used to be the universal refrigerant for air conditioning units, refrigerators, and automobiles.
Sadly, the widespread application of R12 substantially degraded the Earth’s ozone layer. If its use would not cease, it could become a cause of a worldwide health crisis. There was no other option but to phase it out.
In 1994, a mandate was released by the U.S. Environmental Protection Agency (EPA), instructing new vehicles to use the R134a refrigerant instead of the R12.
The mandate came right after the EPA confirmed that the R12 refrigerant contained chlorine, damaging the ozone layer. Can you imagine the number of vehicles on the road each day that all contained R12? This prompted car manufacturers to use the R134a refrigerant, which does not harm the ozone layer.
R12 to R134 Conversion for Vehicles Older Than 1994
Since then, the R12 refrigerant has been phased out. So, if you own a vehicle older than 1994, you are left with two options. It’s either you retrofit your vehicle to make it compatible with the R134a refrigerant, or you continue to use the R12 refrigerant.
Choosing to continue using R12 may come as a challenge to you. First, it is not widely available anymore. You can consider yourself lucky if you can find a regular supplier. Second, it will surely come at a high cost.
The cost of the R12 refrigerant ranges between $500 and $1000 per cylinder. In this case, you might want to consider having your vehicle retrofitted instead. This will not only allow you to use a less costly refrigerant. But you will also comply with EPA regulations.
Aside from that, the R12 refrigerant will most likely be extinct in the next twenty years. So, it is best to switch to R134a.
Conclusion – R12 to R134a Conversion
You may apply the Factory Method to convert your vehicle’s R12 air conditioning system to an R134a system. The factory method allows you to replace all worn-out parts due to age. At the same time, you will also be able to get the best air conditioning performance. The downside of this is that it is time-consuming and costly.
There are conversion kits that are readily available online. Buying from the trusted manufacturers will make it more convenient. That way, you don’t have to buy each part separately. Besides, buying a whole kit will prevent you from buying the wrong parts.
Switching from the R12 refrigerant to the R134a refrigerant may be time-consuming, energy-consuming, and costly. But, come to think of it, it will be all worth it in the long run.
The R12 refrigerant may still be available today but, eventually, it will be completely phased out. At the same time, this refrigerant now has a high cost because of its low demand. So, continuously using this is not wise and practical anymore.
More than anything else, switching to the R134a refrigerant will make you compliant with the regulations implemented by the EPA. If you get caught for your non-compliance, you will only be fined for such a violation. Instead of violating the EPA regulations and paying the fine, save your money instead for switching from R12 to R134a.
Related reading:
Car AC Stopped Working Suddenly [Not Blowing Cold Air]


![Read more about the article Valve Lapping [What Is It and How to Lap Valves?]](https://roadsumo.com/wp-content/uploads/2021/01/valve-lapping-300x200.jpg)

![Read more about the article CV Shaft [CV Axle Shaft Explained – And When to Replace]](https://roadsumo.com/wp-content/uploads/2021/12/CV-shaft-300x200.jpg)